September 06, 2025

What's New in Neos: September 2025

As the seasons change, so does Neos—bringing fresh updates designed to make your workflows smoother and smarter. This latest release, live the night of September 15, is packed with powerful new features that will help your firm stay efficient, productive, and ahead of the curve this season. Read the extended release version.

Watch the “New in Neos” on-demand webinar at your leisure.

New Features
New Enhancements
Improvements and Updates
New Features
New Automation Directory/Management Enhancements (NeosAI Platinum and Customer Request)

Provides firm administrators with a user-friendly interface to view, create, edit, duplicate, and disable automations. This directory simplifies the management and building of complex automated workflows.

Customer request #1555

Automation Directory

Added a new "Automations" tile under User Defined Settings:

  • Displays all firm-wide automations, with a “+ New Automation” option to create additional automations.
  • Users with the "Directories > Automated Workflows" permission enabled can now access the Automations Directory grid.
    • From the “+ Add Automation button”, users can:
      • Create a new automation.
    • From the 3-dot menu, users can:
      • Open the automation in the editor
      • Delete the automation (requires Directory > Automated Workflows > Can Delete permission)
    • Single-clicking an automation in the directory opens a side-pane view with automation details
    • A Filters component has been added to the Automations directory, allowing users to filter by:
      • Trigger
      • Case Type
      • Staff Created
      • Actions
    • A search bar has also been added to the directory grid, enabling searches by automation name

Automation Management

Users can enable or disable automations directly from the side-pane view

  • Disabled automations will not trigger when their conditions are met
  • Requires Directories > Workflow Automations > Can Modify permission
  • Updates the Status column in the directory

Users can copy an automation from the side-pane 3-dot menu

  • Requires Directories > Automated Workflows > Can Add permission
  • Opens a new draft automation in a separate tab with the same trigger and action conditions
  • Makes creating and editing automations easier and more intuitive.
  • Centralizes all automations in a single directory for better management.
  • Improves discoverability of automation capabilities for Platinum users.
Expanded Automation Capabilities  (NeosAI Platinum and Customer Request)
  • New triggers: Change in intake status, Checklist task is added, change in class code
  • New actions: Add case/intake note, add auxiliary checklist
  • A single trigger can have multiple actions
  • Primary staff added to recipient list for email and text message actions
  • Case type trigger condition now allows for multi-select
  • General usability enhancements and UI improvements

Customer Requests #1655, 2302


General Automation Updates

The assignee condition now defaults to "Any Staff" for the following triggers:

  • When a checklist code changes status
  • When a checklist code is added

Case Type conditions are now multi-select:

  • Users can still choose "Any" or select one or more case types from the dropdown.

The Recipient (To) dropdown list for email and SMS actions now includes Case/Intake Primary Staff.

  • The From field dropdown for "Send an Email" and "Send Text Message" now uses a split component with these categories:
    • Roles:
      • Primary Staff
      • Trigger Staff
    • All Staff:
      • Staff codes

For more information on the following, refer to the Knowledge Base.

  • New Trigger: Checklist Task Added to Case - A new trigger, “When a Checklist Task is Added”, allows automations to run when a checklist item is created in a specified status.
  • New Trigger – Class Code Changed - A new automation trigger is available when the class code is changed:
  • New Trigger – Intake Status Changed - A new trigger, "When Intake Status is Changed," is available in the automation trigger dropdown.
  • New Action: Add Auxiliary Checklist
  • New Action: Add Note to Case/Intake - A new automation action, Add Note to Case/Intake, allows users to automatically create a general note on the associated case or intake when the automation is triggered.
  • Add Multiple Actions to a Single Automation - Users can now configure multiple actions within one automation.

Expanded automation capabilities improve productivity for client communication and case management, buoying efficiency for better outcomes.

Example Use cases:

  • When intake status changes:
    • add an auxiliary checklist for the next workflow required and send an email to primary staff to alert them
  • When class code changes (field commonly used for documenting the stage of a case),
    • send a text to the client updating them on the status of their case,
    • send an email to the primary staff informing them of the new status,
    • add an auxiliary checklist to the case for the appropriate workflow that needs to be initiated
    • add a note to the case regarding the class code change
Intake Questions as Tab on Case (NeosAI Platinum and Customer Request)

Users can now view the questions and responses asked during the intake process no matter when the intake was created.

After 14 months of development and refinement, this feature is now fully stable and ready for use.

Customer Request #3363

intake-dynamic-updated.pngintake-update.png


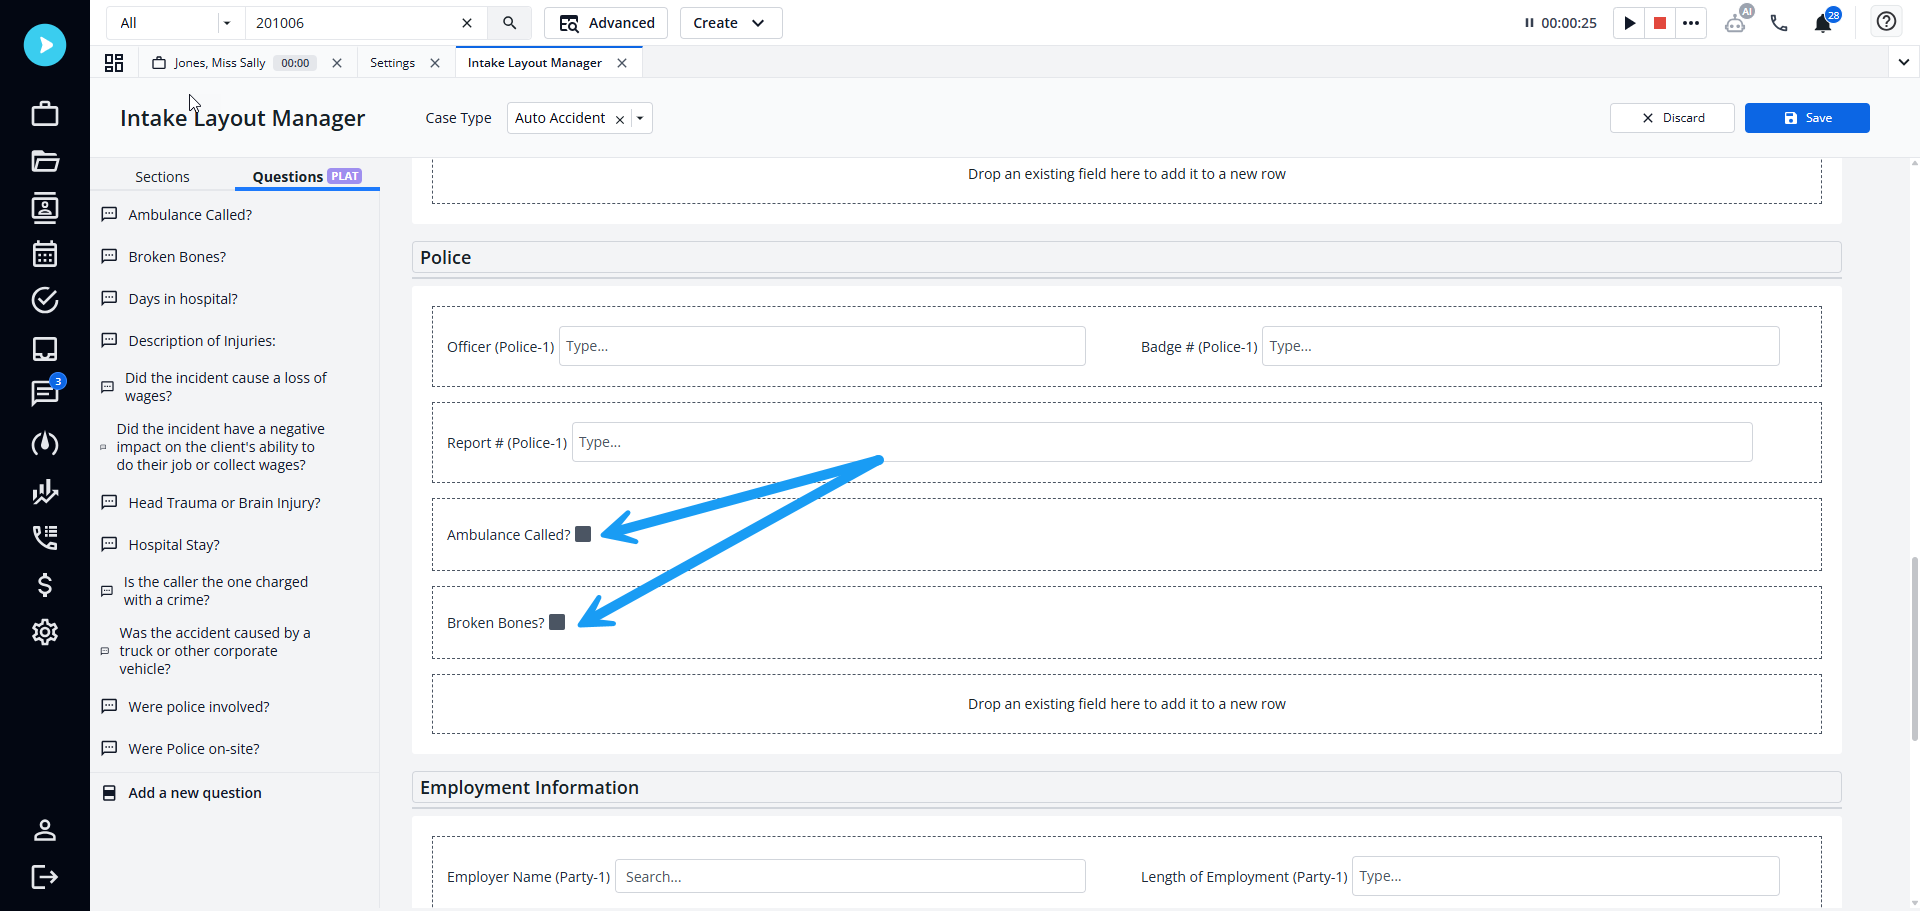
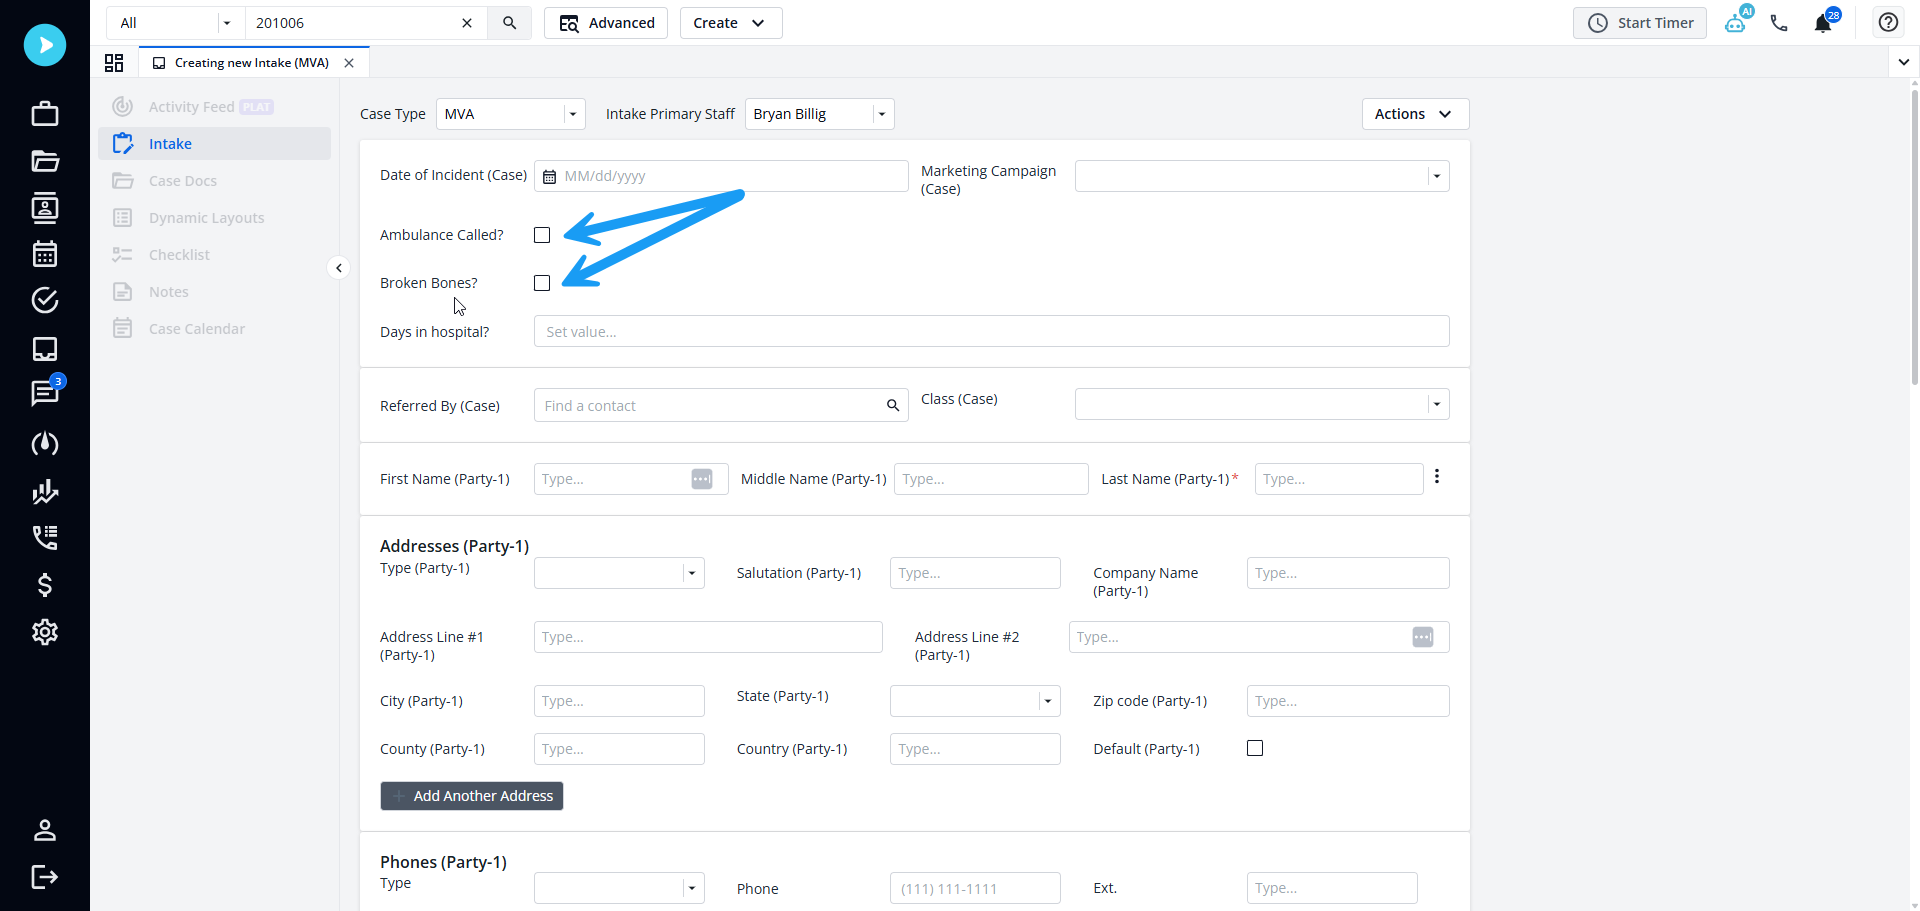
Quick, easy access to dynamic questionnaires reduces back-and-forth activity and ensures greater accuracy in case handling.

New NeosAI Chat Reasoning Modes  (NeosAI Platinum)

NeosAI Chat now goes beyond factual retrieval—users can prompt the assistant to reason about case facts, helping uncover weaknesses, spot missing exhibits, outline cross-examination questions, and draft strategic arguments.


Focused Insight Mode

Users can now leverage a reasoning model (gpt-5) from Azure AI in NeosAI Chat, providing different types of responses depending on the question.

  • When starting a new chat, Broad Scope mode will be the default
    • Broad Scope mode works the same as before, using the general-purpose model (gpt-4.1)
  • Users can switch to Focused Insight mode at any time
    • Once enabled, Focused Insight mode will remain active until the user switches back or starts a new chat

Note: Messages in Focused Insight mode are marked with a purple accent, while Broad Scope messages continue to appear in blue.


Examples of how to use Focus Mode:

  • Contract & Settlement Analysis – Spotting risks, obligations, and opportunities
  • Brief & Motion Drafting – Supporting litigation strategies with data-backed insights
  • Expert Review – Identifying contradictions in testimony, evidence, or expert reports


Link AI Prompts to Specific AI Chat Modes

Users can now link suggested prompts to specific modes in NeosAI Chat.

  • Settings > AI Prompts
    • Added a new column showing the mode(s) each prompt is linked to (specific mode or “All” if linked to both)
    • When creating or editing a prompt, users must select at least one mode to link it to
    • Suggested prompts in NeosAI Chat are now based on the current mode:
      • Prompts linked to a single mode will be suggested only in that mode
      • Prompts linked to both modes will be suggested regardless of the current mode
  • All existing prompts have been linked to Broad Scope mode by default
  • New default prompts have been added for Focused Insight mode


  • The Focused Insight mode leverages a reasoning model to provide deeper, more precise answers to complex questions
  • Linking AI Prompts to specific Chat Modes helps guide users to ask the right questions in each mode
  • Updating suggestions makes it faster and easier for users to engage with NeosAI Chat by surfacing the most relevant prompts right away, enabling users to quickly start conversations that matter most to their workflows


New Enhancements
QuickBooks Online Integration Enhancements 

Users can now automatically sync invoices to QuickBooks Online for approved invoices.


A new Accounting Integration header is now located under Firm Preferences > Time and Billing.

  • If “Sync Approved Invoices” is set as the integration preference in Firm Preferences:
    • Users can now select which QuickBooks Online company an invoice should sync to upon approval
    • Invoices will automatically sync to QuickBooks Online as soon as they are approved

Automating invoice syncing with QuickBooks Online saves time, eliminates manual steps, and ensures accurate, up-to-date financial records.

Dynamic Layouts 

Improvements have been made to the Dynamic Layouts functionality:

  • Bulk Edit and Delete Child Dynamic Layouts
  • Expand Rows in Dynamic Layouts Grids to Display Child Layouts
  • Allow any Field Type to be Used as the Title Column

Ability to Bulk Edit and Delete Child Dynamic Layouts Directly from the Grid

  • Expand a dynamic layout row with one or more children
  • Select one or more child rows
  • Edit is available only when all selected rows are of the same type, opening a window to bulk edit each selected row
  • Delete is always available and will prompt for confirmation before removing the selected rows


Ability to Expand Rows in Dynamic Layouts Grids to Display Child Layouts*

Dynamic layout grids now support expandable rows to view child layouts:

  • Rows with one or more children can be expanded
  • Child layouts are grouped by Type
  • Types with fewer than 6 children expand automatically
  • Types with more than 6 children are collapsed by default
  • Expanded children display in pages of up to 6 per page
  • Single-click a child row to open the side pane for quick edits
  • Double-click a child row to open it fully for detailed edits
  • Child layouts can be expanded up to 3 levels deep

*Applies to All Dynamic Layout Grids


Check the Knowledge Base 2021 for articles explaining:

  • Grid Rows with No Children
  • Grid Rows with Children
  • Auto-Expanded Types with Less Than 6 Children
  • Collapsed Type with More Than 6 Children
  • Paged Children with up to 6 Instances


Allow any Field Type to be Used as the Title Column

Previously, only Alphabetic fields were supported.

  • Settings > Dynamic Layouts:
    • Open any Dynamic Layout
    • Select the column to be the Title by clicking the "Use as Title" radio button
  • Instead of updating or removing records one by one, users can now manage multiple rows at once, ensuring consistency, improving accuracy, and streamlining workflows
  • Expandable rows make it easier to navigate and manage complex data within dynamic layouts; by displaying child layouts directly in the grid, users can quickly review related records, make inline edits, and drill down only when needed
  • Allowing any field type to be used as the Title column gives firms greater flexibility to choose the most meaningful identifier for their dynamic layouts
Advanced Search 
  • Unsubscribe to Advanced Search reports from the subscription email
  • Dashboard viewing permissions re-aligned with Advanced Search permissions
  • Grouping available in Advanced Search for dynamic layout columns

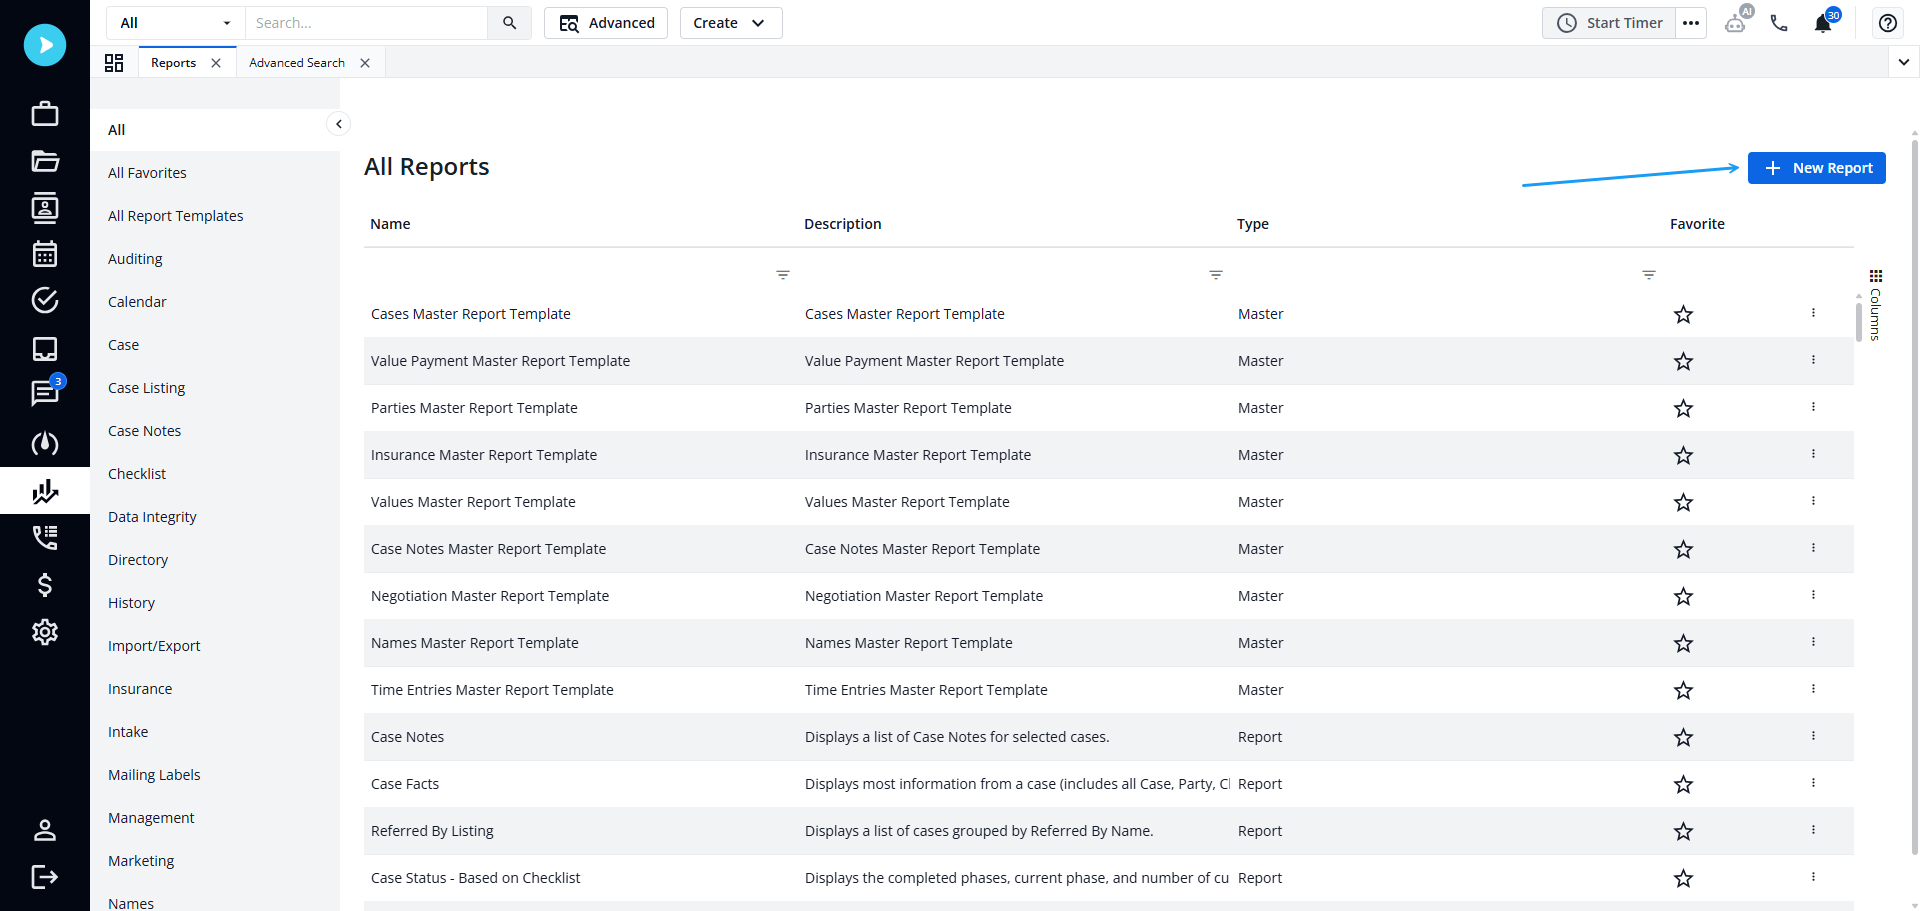
Users can now unsubscribe from a report directly via the subscription email. The link is valid only for users who are already subscribed.


Users with Advanced Search permissions disabled will only be able to view default dashboards and dashboards that have been shared with them.

  • They will not be able to:
    • Create new dashboards or tiles
    • Edit shared dashboards (they can only remove them)
    • See the “View Report” button on each tile


Advanced Search now supports grouping when searching for Dynamic Layout Types.

  • Advanced Search > Search For > any Dynamic Layout
    • Group by any Case column or Linked Parent Record column
    • Examples include viewing dynamic layouts grouped per case, case type, or parent type (such as Case or Document)


Users can now access Advanced Search directly from the Reports tab by selecting the New Report button

Advanced-search-button.png


  • Unsubscribing from reports is now simpler and more user-friendly
  • Firms can grant dashboard viewing access while keeping Advanced Search restricted by adjusting permissions
  • Grouping in Advanced Search makes it easier to analyze and compare dynamic layout data across cases and parent records
  • Providing direct access to Advanced Search from the Reports tab streamlines navigation and reduces clicks
Document Generation: Include Metadata for Dynamic Layout Fields (NeosAI Platinum)

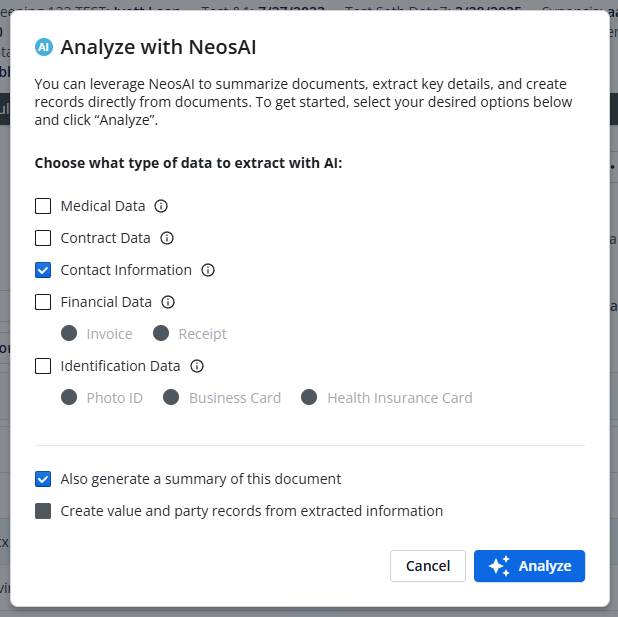
Allows users to include metadata from AI Extractions—such as Medical Codes—when including dynamic layout data as context when using AI to generate documents.

If medical codes are available, a Medical Codes dropdown will appear:

  • If a user chooses none, all will be included
  • If a user chooses one or more, only the selected will be included


Including metadata such as medical codes ensures the AI has the most precise and structured context when generating documents, resulting in more accurate, relevant, and reliable outputs. This is especially important in scenarios where specific coding or terminology is critical.

AI Extractions (NeosAI Platinum)
  • Enable extractions from any document type
  • Bulk party creation
  • AI-powered health insurance card extractions
  • User Prompt When Analyzing Documents in Bulk


Allow Extractions on Any Document Type:

Document analysis now supports flexible extraction options:

  • Choose from any available extraction types to run
  • By default, the extraction linked to the document type is pre-selected
  • Only one Financial or Identification extraction can be selected at a time (e.g., Photo ID and Business Card cannot be run together)
  • Summary generation is always selected by default. If a summary already exists, it will not be generated again
  • Extractions can be run multiple times; each run creates new dynamic layouts with the extracted data
  • Medical and Contact extractions are supported only for Word and PDF documents
  • Option to create value records and/or parties from extracted data is enabled only when Financial and/or Identification extractions are selected. If both are selected, Party creation will display first, followed by Value creation
AI-extraction-again.png


Bulk Party Creation

  • Select one or more documents in the grid > Bulk Actions > Analyze with NeosAI
  • Choose any Identification Data extraction type
  • The option to create parties from extracted data is selected automatically
  • After extraction, data from each document is used to create parties
  • Parties are deduplicated by Full Name, and data is merged so that a single party is created
  • Users can modify the name, role, address, phone number, and email address before saving
  • Additional extracted data (such as extra addresses or phone numbers) is saved to the party automatically
AI-extraction.png


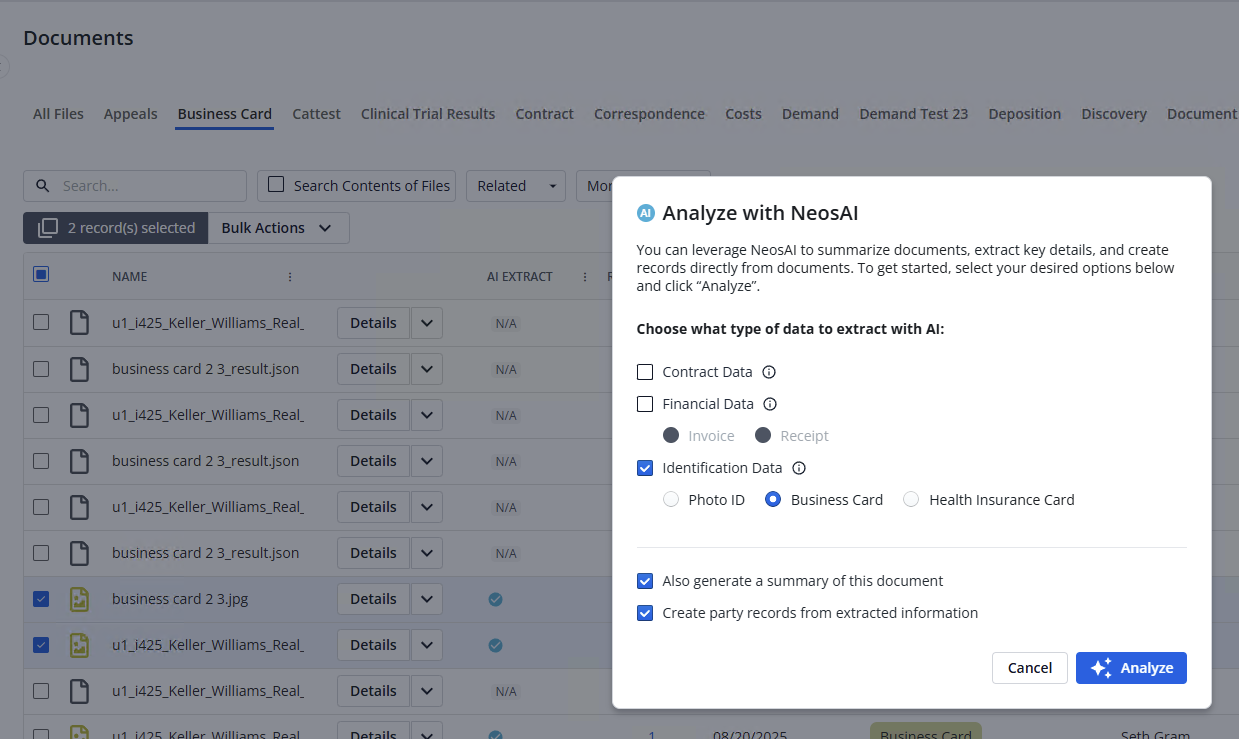
Health Insurance Card Extractions

New default dynamic layouts have been created:

  • Health Insurance Card
  • Dependent
  • Copay
  • Payer
  • Medicare/Medicaid

A new document type, Health Insurance Card, has also been added with the category “Health Insurance Card.”

  • Users can assign the category to custom document types from Document Type Settings > Edit Fields

A new extraction option, Health Insurance Card Extraction, is now available.

  • Documents added to Neos with this category will automatically use the new extraction type:
    • Data from the document will be extracted using AI and stored in the Dynamic Layouts linked to it
  • Users can create parties from the extracted data:
    • Party Name will be populated from the Member Name
    • Date of Birth and Gender will also be carried over, if available


User Prompt When Analyzing Documents in Bulk

On the documents grid, select one or more documents:

  • Navigate to Bulk Actions > Analyze with NeosAI
    • Users will have the same extraction options as with a single document.
      • When a single document is selected, or all selected documents share the same (or no) document type, an extraction option will be auto-selected based on the document type.
  • Users will see all extraction options compatible with any selected document.
    • If an extraction option is not compatible with a selected document, it will not be performed on that document.
  • If a summary has already been generated for a selected document, it will not be generated again.
  • If an extraction option has already been performed on a selected document, it will be performed again and a new dynamic layout with extracted data will be added to the document
  • The option to create value records in bulk is not yet available.


Select Extraction Options on Drag-and-Drop Upload:

When uploading documents via drag and drop, users can now select which extraction options to run during the upload process

  • Drag and drop documents onto the grid > toggle on Analyze with NeosAI > Save
  • Drag and drop documents onto the NeosAI Chat side pane > Analyze with NeosAI is auto-enabled > Save
  • Users are prompted to select extraction options, with the same choices available as single document and bulk analysis
  • If a single document is dropped, or all documents share the same document type, an extraction option is auto-selected based on that type
  • All extraction options compatible with any uploaded document are displayed
  • If an extraction option is not compatible with a document, it will not be performed on that document
  • The option to create party and value records in bulk is not available


  • Allowing extractions on any document type gives users far greater flexibility and control to choose the extraction type most relevant to their workflow when analyzing case materials.
  • Bulk party creation streamlines data entry by allowing users to generate multiple parties at once from Photo IDs, Business Cards, and Health Insurance Cards. Extracted data is automatically merged and deduplicated, ensuring accuracy while saving time.
  • Managing health insurance details manually can be time-consuming and error prone. With AI-powered health insurance card extractions, key information is automatically captured and organized into dynamic layouts, delivering greater accuracy and consistency.
  • Prompting users to confirm extraction settings when analyzing documents in bulk ensures both efficiency and accuracy. It reduces repetitive manual work by letting multiple documents be processed at once, while still giving users control over which extractions are applied.

  • Allowing a selection of extraction options streamlines the workflow by letting users choose extraction options during the document upload process, eliminating the need for extra steps afterward. It ensures that the right data is captured immediately improving efficiency, accuracy, and consistency across case records.

  • Bulk Party Creation streamlines data entry by allowing users to generate multiple parties at once from Photo IDs, Business Cards, and Health Insurance Cards. Extracted data is automatically merged and deduplicated, ensuring accuracy while saving time.

Case and Layout Enhancements 

Several updates across case layouts, search functionality, notes, communication tools, and tab displays have improved usability and efficiency.

Browse Cases - First Party Search

  • A new “Party Name” field lets users search First Party names to return cases
    • The search triggers once two or more characters are entered

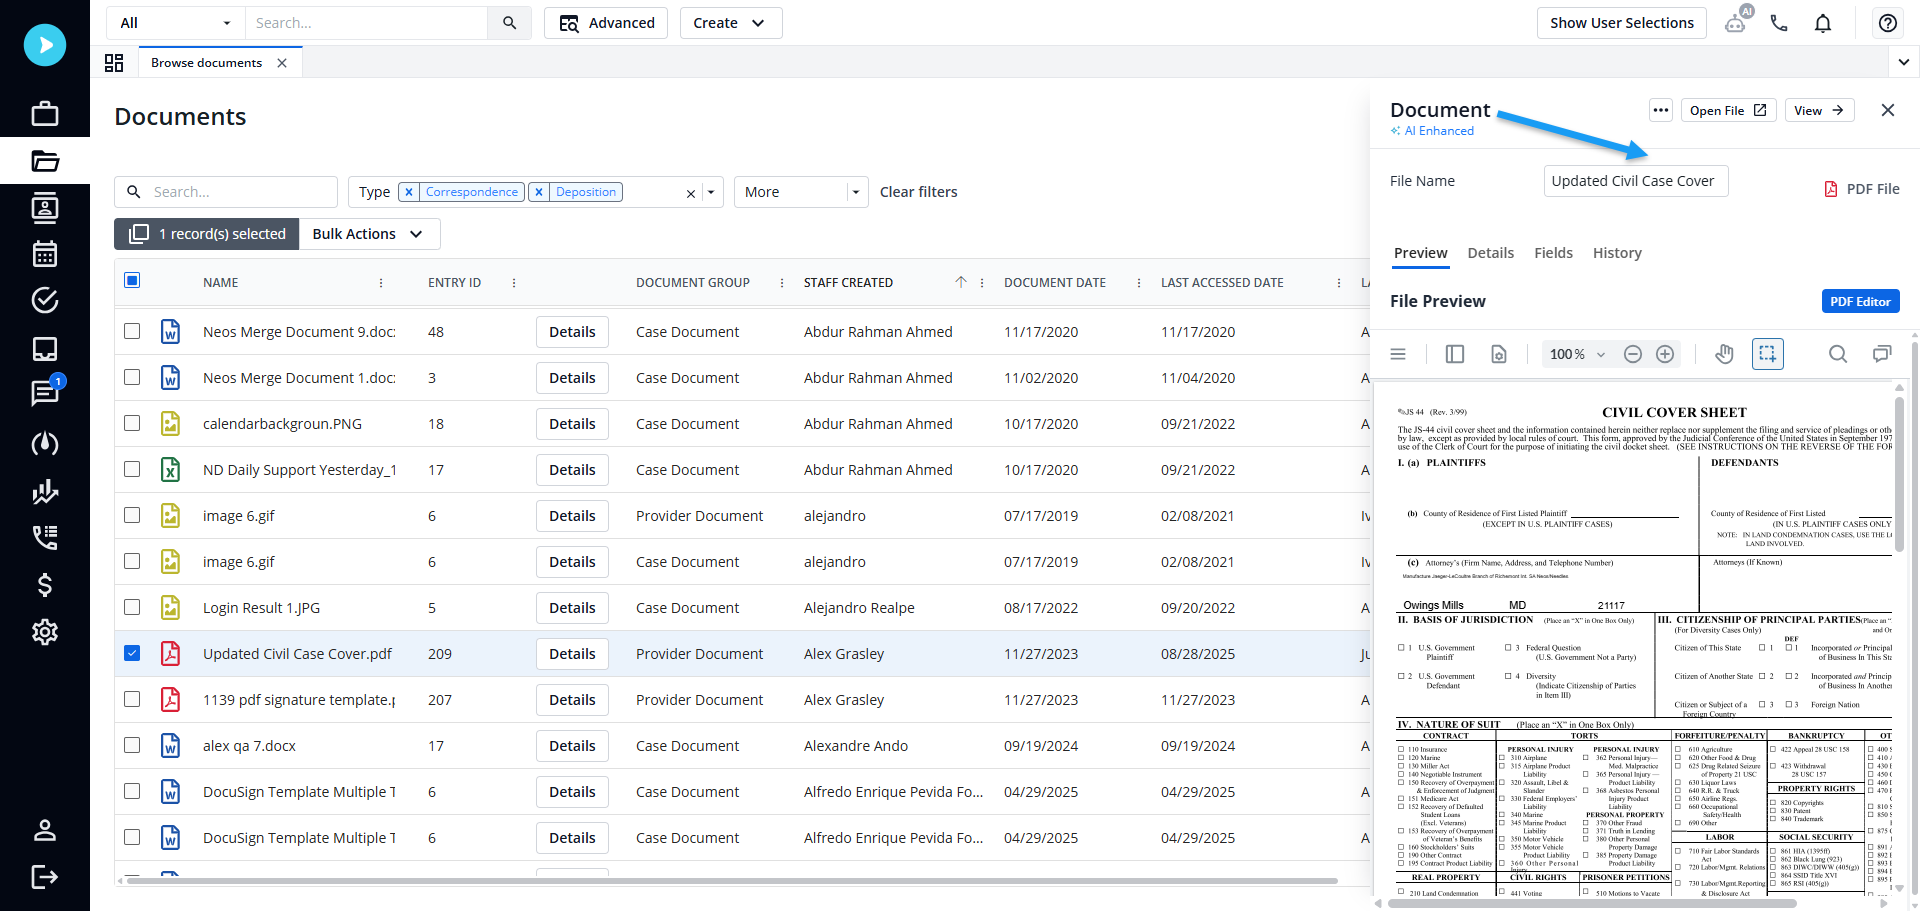
Rename Documents from Side Pan Header:

  • Users can now rename a document directly from the side pane header without leaving the view.
rename-content-case-layout.png


Notes Tab - Display Options:

  • Added two new view modes:
    • Compact View (default): Shows one line per note
    • Spacious View: Shows two lines per note


Communications Contact Tab: Export and Print

  • Export and print functions are now supported directly in this tab.


Case & Browse Documents Tabs – Search Behavior

  • Entering search terms will now return results based only on filenames, improving precision.


Case Tab Title Update

  • Case tab titles are now limited to 40 characters. If a title exceeds this limit, it will be truncated with an ellipsis.
    • When hovering over the tab, the tooltip will display the full Case Name, but it will no longer include the case number.


Send Email Modal - New Email Card Design

  • A refreshed card design now appears under the To, CC, and BCC fields for clearer recipient display.


Contact Detail Pane Layout

  • The Contact Detail pane has been updated to a container-based layout, making key sections easier to distinguish and visually consistent with the Case Info tab.


Related Documents: Added Filters

  • Users can now filter related attached documents by “Type,” “Category,” or “Tags”


These enhancements make it easier for users to quickly locate information, customize their workspace, and perform common actions without extra steps.

Contact Language Dropdown (Customer Request)

A new Preferred Language dropdown has been added to contacts and parties (not available for companies). Users can select a contact’s language from a predefined list of supported languages.

language-content-panel.png


A new Language dropdown field is available in the contact and party detail view.

  • The field is also available in Advanced Search (as criteria and column) and in the Intake Layout Manager
    • English is the default option for new contacts. Existing contacts will not have a pre-selected language
    • Users can select from a list of supported languages (Amharic, Arabic, Bengali, Chinese, English, French, German, Greek, Gujarati, Haitian Creole, Hebrew, Hindi, Hmong, Italian, Japanese, Khmer, Korean, Navajo, Persian, Polish, Portuguese, Punjabi, Russian, Spanish, Tagalog, Tamil, Telugu, Thai, Urdu, Vietnamese)

Capturing a contact’s preferred language helps firms communicate more effectively, personalize interactions, and improve accessibility. It also makes it easier to search, filter, and manage cases involving multilingual parties.

Global Search Updates (Customer Request)

The case, intake, and contact search cards in Global Search have been redesigned with updated styling and layouts.

Side-by-Side Detail Pane View

  • When screen width is 1280px or greater, single-clicking a result in Global Search opens the detail preview pane beside the search results (no changes occur for screens smaller than 1280px)
  • Single-clicking a linked entity (for example, Parties linked to Cases/Intakes or Cases/Intakes linked to Contacts) loads the linked entity’s details in the same preview pane
    • Double-clicking opens the entity in a new tab


Updated Case, Intake, and Contact Cards

  • The Search card text color is updated to a darker shade.
  • Case Search card
  • “Case Name” now displays on the first line (replacing “Case Number”)
  • “Case Number” has been moved to the second line.
  • “Alt Case Number” displays on the first line of the second column.
  • “Lim” label is now uppercase “LIM”
  • Contact Search card
  • Address displays on the second line with a location-pin icon; long addresses are truncated with an ellipsis
  • Phone number and email appear on the third line with their respective icons; both truncated with an ellipsis
  • Date of Birth displays with a calendar icon (without the “DOB:” prefix)
  • Intake Search card
  • “Lim” label is now uppercase “LIM"

The Side-by-Side detail pane and updated search cards improve efficiency by reducing navigation, enhancing readability, and making it faster to review and scan results.

global-cards.png


Checklist Updates 

The Case Checklist experience has been enhanced with a redesigned side pane for managing automations, clickable Case #/Intake # and Case Name links in the Checklist Summary and Neos Today widget, updated Add Auxiliary and Add Checklist Task modals with clearer labels and advanced filtering, and improved tab usability with clearer button labels, color updates, and streamlined editing.

Checklist Item Settings: Side Pane Updates

  • Users can now manage automations directly within checklist items. Automations are displayed in a vertical list, each with a pencil icon to open the Automations Editor and an ellipsis menu to delete. When deleting, users see a confirmation modal with updated text:
    • Title: Delete Automation
    • Body: "Deleting this automation will remove it for all checklist items with matching trigger conditions in Neos. Deleting can’t be undone."


checklist-update.png


Refer to the Knowledge Base for more detailed explanations of the following updates:

  • Checklist Summary: Clickable Case and Intake Links - The "Case #/Intake #" and "Case Name" columns in the Checklist Summary now include direct links to their associated case or intake.
  • Case Checklist: Updates to Add Auxiliary and Add Checklist Task
  • Case Checklist Tab Updates

These updates simplify how users interact with checklists, making it easier to manage automations, quickly navigate to related cases, and work more efficiently with checklist tasks. By improving clarity, navigation, and filtering, these changes reduce clicks, save time, and ensure a smoother overall workflow.

Improvements and Updates
Document Assembly: Populate Dynamic Layout Tags 

Users can now insert Dynamic Layout tags into a document template, which will be populated with data from the selected instance during Document Generation.

Register for the New in Neos webinar on September 17 at 1pm ET!

Hosted by the ebullient Bryan Billig, VP of Customer Education

Bryan will demo all the amazing new features being released this month in real time, cracking jokes along the way.

SHARE

Related to this article

new in neos feb

Legal Tech

Check out all the innovative new features and enhancements coming out with February's brand new release!

Working on laptop

Check out all the innovative new features and enhancements coming out with November's brand new release!

Working on laptop

Check out all the innovative new features and enhancements coming out with September's brand new release!

Schedule a Neos demo

Manage your daily operations in less time, so you can spend more time focusing on your clients. See how it's possible.